
PROTECTING & CLEANING NEUMANN MICROPHONES
Protect & clean your microphones especially for vocal and speech recordings.
A PDF version of this note can be downloaded here.
Due to the current COVID-19 pandemic we assembled this note on protecting and cleaning Neumann microphones and accessories. Especially for vocal and speech recordings, microphones are often used at close proximity to the mouth, possibly also by multiple users.
To reduce the risk of spreading diseases through bacteria and viruses, one or more remedies, explained in detail below, may be used:
- ideally, have just one user per microphone (including the accessories),
- after or before use, clean all surfaces, i.e. microphone housings, head baskets and accessories,
- leave the microphone unused for some time, possibly also applying elevated temperature to the microphone
- utilize accessories such as windshields and thin plastic film bags to add protection
Medical Disclaimer
This note assembles technical advice on which measures may be taken, and which materials should be used or not used, to protect and clean microphones and accessories without harming them.
For medical information on disinfection and disease spread please consult your national and regional medical authorities and follow their advice.
Contents
- Cleaning Neumann microphones
- Time and heat
- Protecting microphones with foam windshields
- Acoustical effects of foam windshields
- Protecting microphones with plastic film / bags
- Acoustical effects of plastic film / bags
- Further notes
1. Cleaning Neumann microphones
Cleaning the microphone housing
For cleaning Neumann microphone housings from soiling including human exhalations, you may use ethyl alcohol (ethanol) or isopropyl alcohol (isopropanol). Used as a disinfectant, typically a 70% solution is used. Apply with a disposable soft cloth, a soft brush or paper tissue. Make sure that the liquid is applied only to the outside of the microphone and does not enter the inside or the capsule. Do not apply the liquids to the circumferential type labels.
Do not use rough materials which might scratch the surface. Do not use any solvents stronger than ethanol or isopropanol, as these might damage the surface.
Never use sprays, as these can deposit on the membrane and thus damage the microphone capsule!
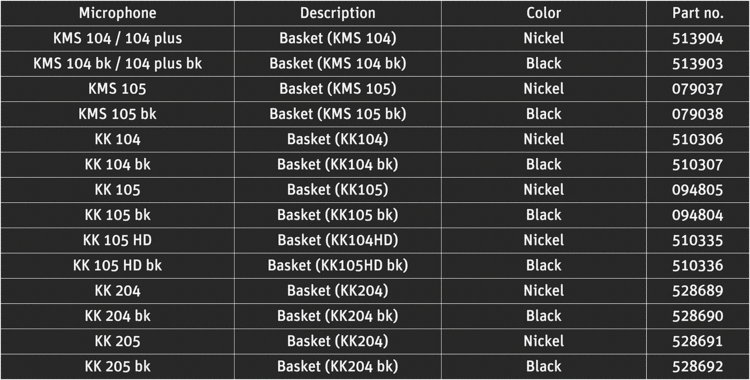
Cleaning removable microphone head baskets
With some microphones, the head basket can be easily removed for cleaning (KMS 104 / 105, KK 104 / 105, KK 204 / 205 and BCM 104 / 705). Make sure not to touch or damage the capsule!
With the head baskets containing foam windshields, remove the inner foam and clean it separately as described below (KMS 104, KK 104, KK 204 / 205 and the BCM 705). Metal head baskets can then be cleaned also on the inside with ethanol or isopropanol. You may also immerse the head basket in clean, hot water (e.g. 70°C / 160°F). Do not use the dishwasher. Let the basket dry out completely before re-assembly.
Personalized head baskets
BCM 104 and BCM 705 were constructed for simple switching between personalized head baskets, so each user can use his own basket. Baskets for BCM are available as spare parts:

For hand-held microphones these head baskets are available as spare parts:
Cleaning the inner assembly / amplifier
The inner assemblies / amplifiers are typically enclosed in the housing and well protected from outside soiling. Cleaning will hardly ever be necessary. Only a soft brush should be used to clean off dust and soiling. Do not use any liquids or solvents, as the insulation and sensitive parts of the circuit may be harmed.
Cleaning the capsule
If this should become necessary, it strictly must be done only by a skilled serviced technician. The membrane is too delicate to be cleaned without the proper expertise.
2. Time, and applying heat to the microphone
By taking a microphone out of action for a minimum of 6 hours, before putting it back to use for another user, the infectiousness of human exhalations deposited on the metal surfaces may be significantly reduced. For plastic or cloth accessories, an extended period of 48 hours or more is needed to achieve similar results. To accelerate this procedure, Neumann microphones may be heated up to 60°C/140°F without affecting the properties of the microphone. As not all details are 100% assured facts to this day, please consult your national or regional health authorities regarding the possible transmission via surfaces.
3. Protecting microphones with foam windshields
Foam windshield are mostly used to reduce wind and pop disturbances. But they also serve to protect a microphone, at least partly, from rain, water, soiling and human exhalations. Nylon pop screens are very thin and will hardly protect the microphone from exhalations.
For almost all Neumann microphones, foam windshields are available:
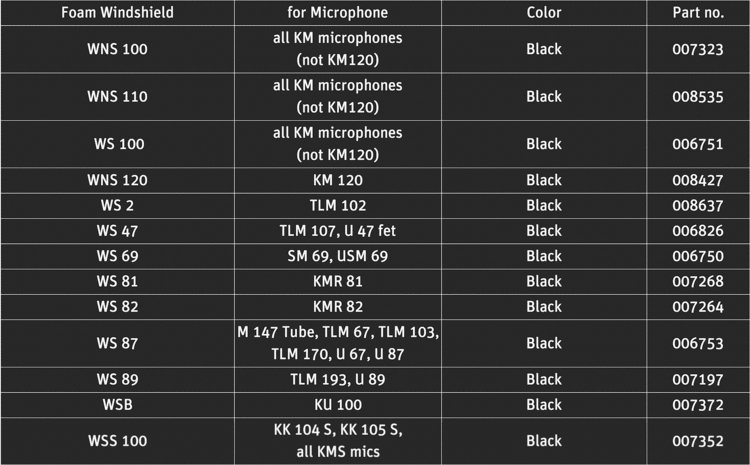
Cleaning foam windshields
Foam windshields may be cleaned with warm-to-hot water, up to 60°C/140°F. If necessary, dish washing liquid may be applied. Thoroughly rinse the foam and let it dry before putting it back to use. Moderate heat of up to 60°C/140°F may be applied for faster drying. Do not use ethanol, isopropanol or other liquids or solvents. Do not use the dishwasher.
4. Acoustical effects of foam windshields
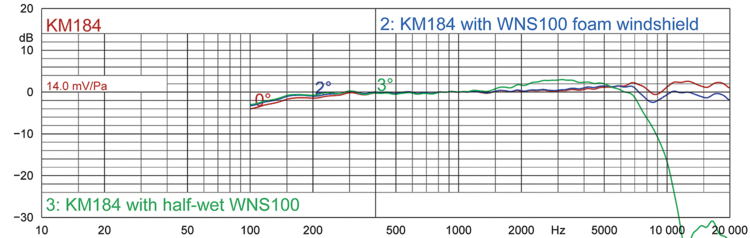
Neumann foam windshields will affect the sound only slightly to moderately, depending on the thickness of the foam. Typically, the high frequencies above 5 kHz will be slightly attenuated. This can be easily remedied with some equalization of the recording. Likewise, small changes in the low frequencies, including the bass boost by proximity effect, can be remedied with a low frequency EQ.
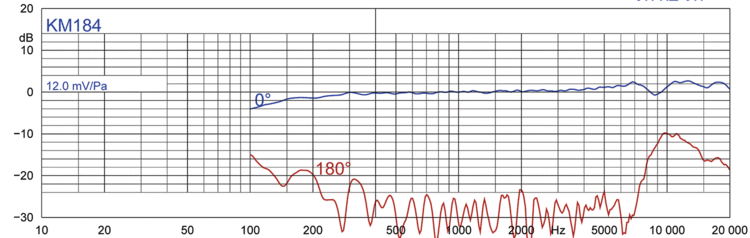
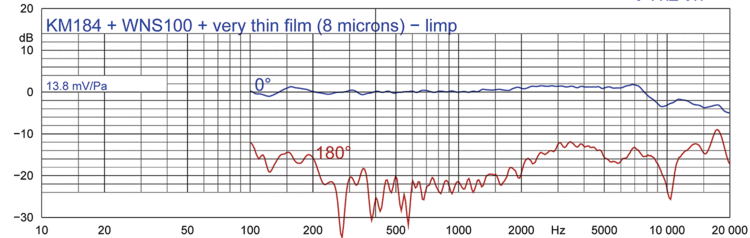
Figure 1 shows the slight effect (-2 dB @ 10kHz) of a small WNS 100 foam windshield on a KM 184 cardioid microphone’s response. An additional curve shows that a half-wet WNS 100 (after washing with water & dish washing liquid) produces a severe roll-off in the high frequencies. So, let the foam dry out completely before putting it back to use.
5. Protecting microphones with plastic film / bags
This is not a typical use for microphones, and only some recommendations can be given here. The main aim is to provide help for situations where no other solution can be applied.
A foam windscreen will help, but it may not protect a microphone 100% from exhalations. So, especially for multi-user applications, additional plastic film or bags may be used as cover. Take separate disposable thin film material for each user. Use bags with no ventilation holes and dispose of them after single-use. Enclose all parts of the microphone that may become soiled.
Some hints:
- Use very thin plastic material
- Choose soft, flexible material to minimize crackling, fluttering, rustling, or rubbing noises during the recording
- Leave some air volume around the capsule (e.g. the head basket, or use a foam windshield)
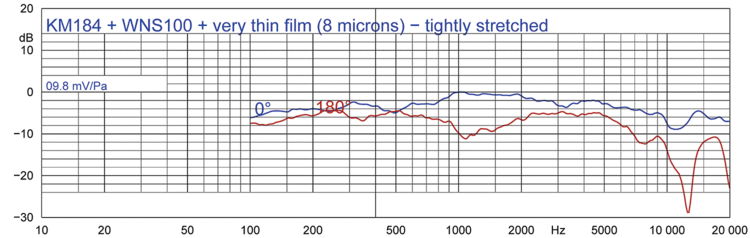
- Do not tension or stretch the film tightly
- Make test recordings to become acquainted with your specific solution, how to noiselessly handle the plastic film and how to best equalize the signal
6. Acoustical effects of plastic film / bags
Plastic film or bags will affect the sound of a microphone. Still, especially for speech recordings, the response may be equalized to obtain usable quality. Typically, plastic bags will produce these effects, increasing with the thickness and stiffness of the film:
- Mid-range frequencies will be the least affected
- Roll-off at high frequencies, e.g. above 4-8 kHz
- Reduced directivity
- Reduced proximity effect at low frequencies
- Roll-off at low frequencies
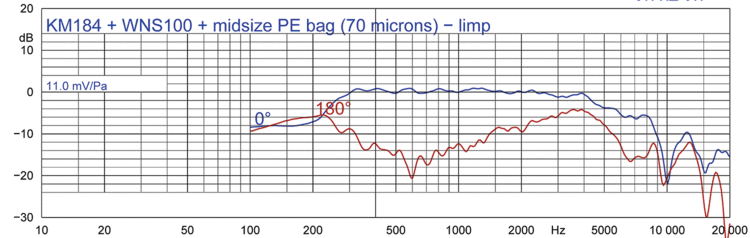
As the following figures show, low and high frequency boosts of a few dB may serve to linearize the response of a micro-phone inside a plastic film bag. These plots serve just as indication of the effects of plastic bags. The specific values will vary, depending on the microphone and plastic bag configuration. These figures are exemplary measurements of KM 184 with different plastic bag and WNS 100 windshield configurations (measured at 1m).
Recommendable solutions: thin film/ bags, not tensioned

Not recommendable solutions: stretched or thick plastic film / bags
7. Further notes
Omnidirectional microphones
These microphones are less affected by foam windshields and plastic bags. Contemplate the possibility of using omnidirectional microphones also for situations where otherwise you would have chosen a directive microphone. With plastic bags, a simple high frequency boost above 3 kHz may already linearize the response sufficiently.
Further Information
For further information please contact us at service@neumann.com or contact your national Neumann distributor and service partners.